Out of the box, SharePoint 2010 offers several styles that can be selected when creating a view of a list or library. One really useful style is the Preview Pane. If you have a list with a lot of columns, the Preview Pane style is great for creating a vertical view of the data, avoiding the dreaded horizontal scroll. If you’re not familiar with the Preview Pane, Microsoft has a quick screen cast that shows how to use it.
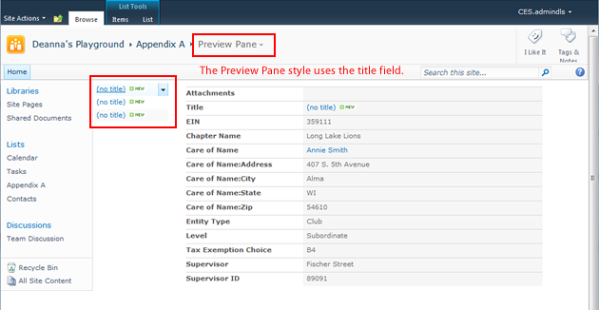
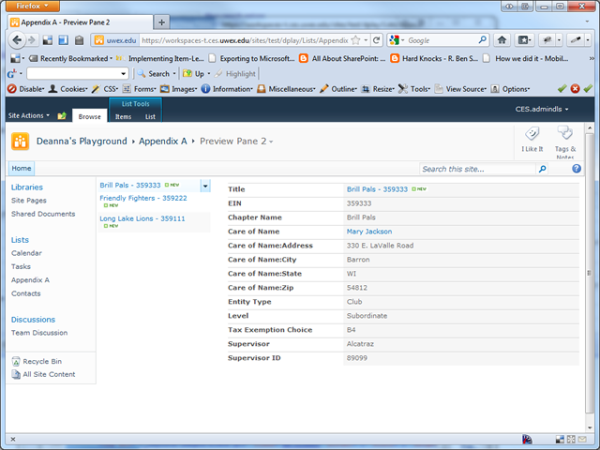
Unfortunately, out of the box, there’s no way to identify which column should be used in the pick list – that list of items on the left side of the preview pane. It defaults to the title column, and there’s no way in the web-based tools to modify that. So, what happens if for some reason you’re not using the title column in the intended manner? Well, you end up with something like this:
Not so great, right? If you Google around for a solution, you’ll find options such as using a workflow to update the title column with the data you want when an item is added or using a CAML editor tool. Hm…. No thanks.
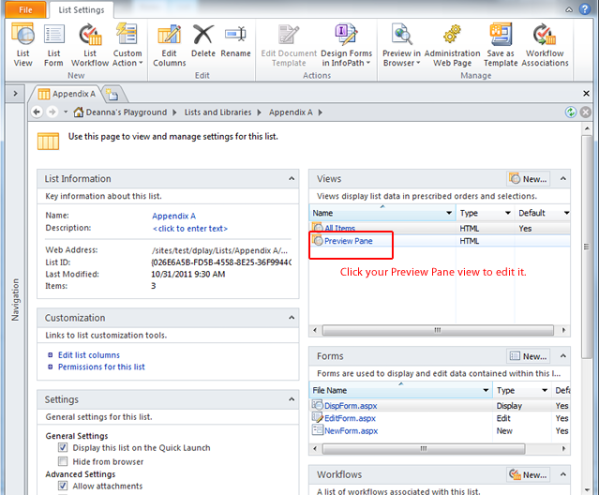
Turns out that you can make it work with a little help from SharePoint Designer. Fire up SharePoint Designer 2010. Load your site. Navigate to your list. In the Views module, click the preview pane view that you created. (If you haven’t created one, watch that screen cast and create one first.)
Now that you’re in edit mode for the Preview Pane style, do any of the typical tweaks you might do on any view – change the sort order, the paging, add or remove columns. Do everything you might want to do using the Ribbon options before we get to this next part. It makes life easier.
Now for the fun stuff.
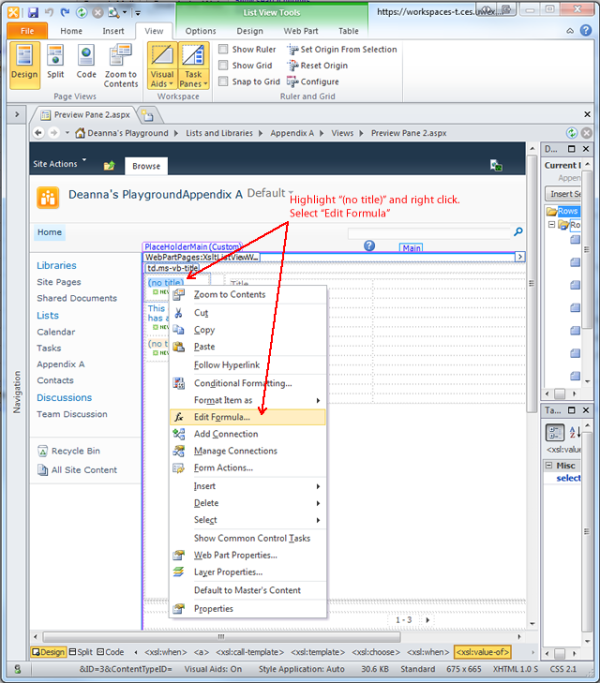
Find either the title or the words “(no title)” in the left column. Highlight either the title in a row of data or the “(no title)” words. Right click, and select “Edit Formula.”
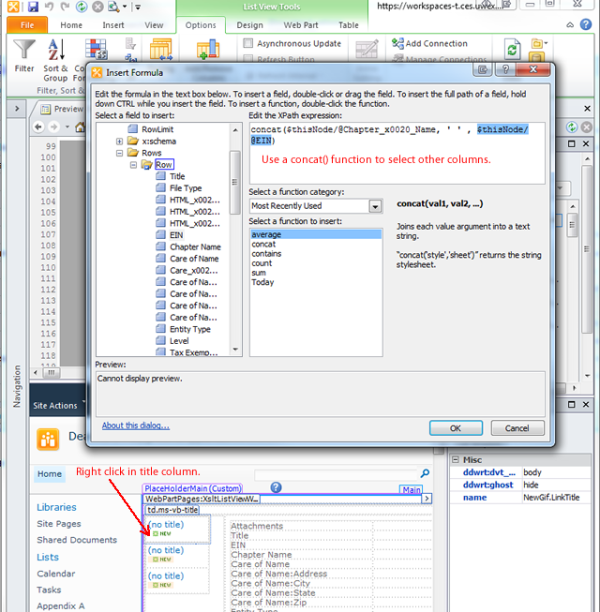
A pop-up window will open where you can select another column of data, enter static text, or use any number of formulas to generate the text you want to use. I concatenated two columns.
If you have some rows of data with titles and some without, you’ll need to repeat this process for both types of columns.
So, what’s happening behind the scenes is that a new XSLT template is being added to code view. It’s called the “LinkTitleValue.LinkTitle” template, and it determines what data is being used for the link to the item. The template looks like this:
< xsl:template name="LinkTitleValue.LinkTitle" ddwrt:dvt_mode="body" ddwrt:ghost="" xmlns:ddwrt2="urn:frontpage:internal">
< xsl:param name="thisNode" select="."/>
< xsl:param name="ShowAccessibleIcon" select="0"/>
< xsl:variable name="titlevalue" select="$thisNode/@Title"/>
< xsl:choose>
< xsl:when test="$titlevalue=''">
< xsl:value-of select="concat($thisNode/@Chapter_x0020_Name, ' - ', $thisNode/@EIN)"/>
< /xsl:when>
< xsl:otherwise>
< xsl:choose>
< xsl:when test="$HasTitleField">
< xsl:value-of select="concat($thisNode/@Chapter_x0020_Name, ' - ', $thisNode/@EIN)" />
< /xsl:when>
< xsl:otherwise>
< xsl:value-of select="$titlevalue" />
< /xsl:otherwise>
< /xsl:choose>
< /xsl:otherwise>
< /xsl:choose>
< xsl:choose>
< xsl:when test="$ShowAccessibleIcon">
< img src="/_layouts/images/blank.gif" border="0" width="1" height="1" alt="{$idPresEnabled}" />
< /xsl:when>
< xsl:otherwise></xsl:otherwise>
< /xsl:choose>
< /xsl:template>
Save your file and test it. Looks great, right?
You have now successfully replaced your title with your preferred information and it’s linked to the item. It also has an ECB menu attached to the item.
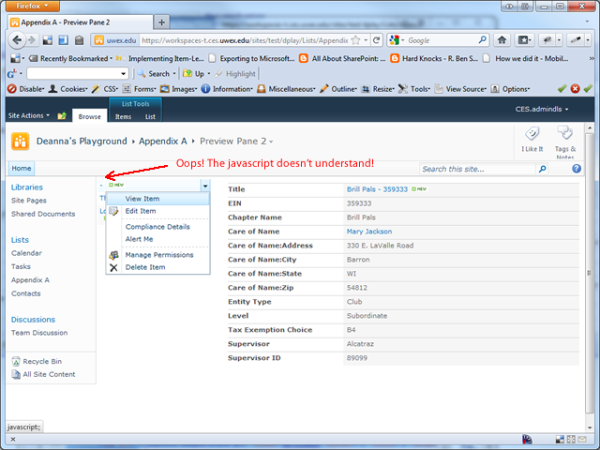
What happens if we use the ECB menu to view or edit the item? Oops! The Javascript gets confused and it drops out the text we just spent our time putting in there!
I haven’t dug into why this is happening, and I’m sure someone else will do that. (Leave a comment if you figure it out!) But, I do have a workaround. One more step. I find this step easier to do back in the browser. So, save and close SharePoint Designer. Fire up notepad and type the following:
< style type="text/css">
.s4-ctx {
display:none;
}
</style>
Save it as a text file and upload it to your site. Make note of the location. (Right click and “copy shortcut.”) (I used the “site assets” library.)
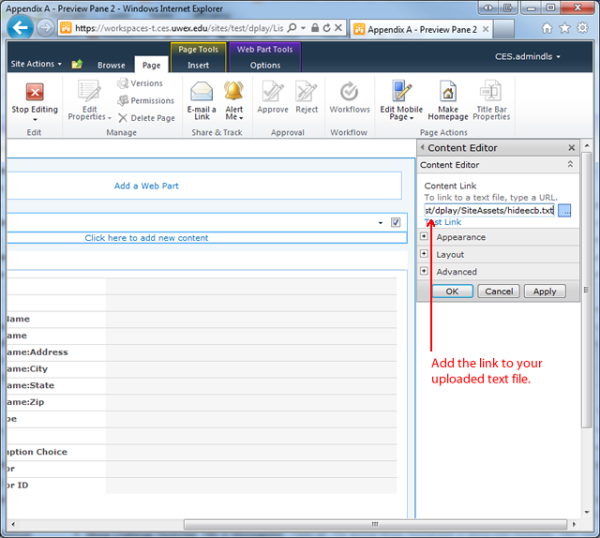
Navigate to your view. Select Site Actions -> Edit Page. Add a Content Editor Web Part and edit the web part to add a Content Link. Paste the shortcut and click “Ok.”
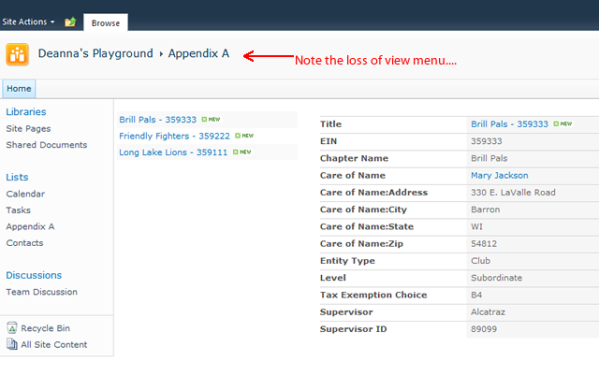
Save your file. Your “title” pane will now have the data you want, minus the ECB menu. Hovering over the item will load it in the preview pane. Clicking it will load the pop-up window for viewing or editing the content. One caveat, and Microsoft insists it’s a “feature – not a bug,” is that you’ve now lost your view menu in the breadcrumbs. (Glyn Clough provides more information about this issue. And Pentalogic has a free solution that fixes the issue on all pages, but may be a bit “nuclear,” as they put it.)
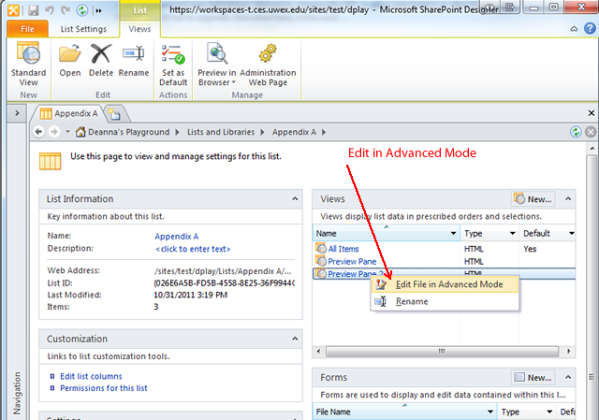
The workaround for that is to edit the page in SharePoint Designer to add your custom css. However, this customizes the page. You’ll have to choose whether you’d rather deal with customized pages or an alteration of the the UI. If you want to customize the page and retain the breadcrumbs, remove the Content Editor Webpart and save your page. Fire up SharePoint Designer again. Navigate to your list. Right click on your Preview Pane view and select “Edit File in Advanced Mode.”
Note: If you do not have the Edit File in Advanced Mode option, it is because your site collection or farm administrator has restricted the use of SharePoint Designer in your environment.
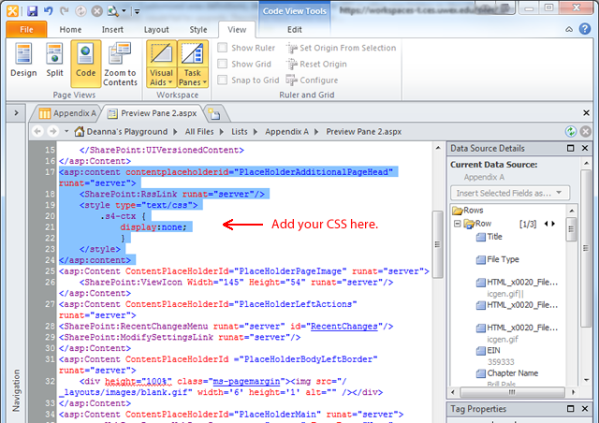
Once your view loads in advanced mode, switch to code view and search for “PlaceHolderAdditionalPageHead.” Add the CSS we had previously added via the Content Editor Webpart to that tag, like so:
Save your file. Voila – you now have customized title pane with no ECB menu and have retained the view selector breadcrumb.
The other major advantage of using this method versus the Content Editor Webpart is that the CSS will render in the head of the page, where it belongs. However, if you do choose to use this approach, make sure you are tracking what pages you are customizing so that when it comes time to upgrade you’ll know which files need to be double-checked.
Comments are closed